How to instal Wordpress Desktop on Manjaro 16.10

This tutorial is going to show you how to install Wordpress Desktop on Manjaro 16.10. Wordpress Desktop is a great tool to manage your Wordpress blogs. It supports Wordpress.com site and also self-hosted wordpress site. Wordpress Desktop available for Android, Linux, iOS and also Windows Operating Systems.


Wordpress Desktop on Manjaro 16.10


Wordpress Desktop 2.0 works perfectly on my Manjaro 16.10


How to install Wordpress Desktop 2.0 Manjaro 16.10

How to install LAMP Server (Apache, MariaDb and PHP7) on Manjaro 16.10

This tutorial will guide you to install LAMP Stack on Manjaro Linux. LAMP is a perfect combination of Linux, Apache, MySQL and PHP to build a powerful and reliable server on Linux OS. I am using Manjaro 16.10 on this tutorial but it should be applicable to any other Arch based Linux distribution. Most steps on this tutorial were done on Terminal with root permission.

Steps to install LAMP Stack on Manjaro

Step 1. Update Manjaro

Its always a good practice to make sure that our system is up to date. 
sudo pacman -Syu

 Step 2. Install Apache

sudo pacman -S apache
After Apache is installed, we need to check the Apache configuration. 
sudo nano /etc/httpd/conf/httpd.conf
Find and comment out the following line:
#LoadModule unique_id_module modules/mod_unique_id.so

Restart Apache
sudo systemctl restart apache
Now check the apache status
sudo systemctl status httpd
At this point Apache is installed and the status is running. But its better to test it by creating an index.html in Apache root directory.
sudo nano /srv/http/index.html
Add some html lines
<html>
<title>Welcome</title>
<body>
<h2>Hello, Welcome to Manjaro</h2>
http://gamblisfx.com
</body>
</html>
Now open web browser type the Manjaro IP address as follow:

Step 3. Install MySQL Server

Command to install MySQL Server on Manjaro.
sudo pacman -S mysql
Please note that by executing the command, you will install Mariadb instead of MySQL.
Start MySQL service
sudo systemctl start mariadb
Check Mariadb status
sudo systemctl status mariadb
Secure the MySQL Installation
mysql_secure_installation

Step 3. Install PHP

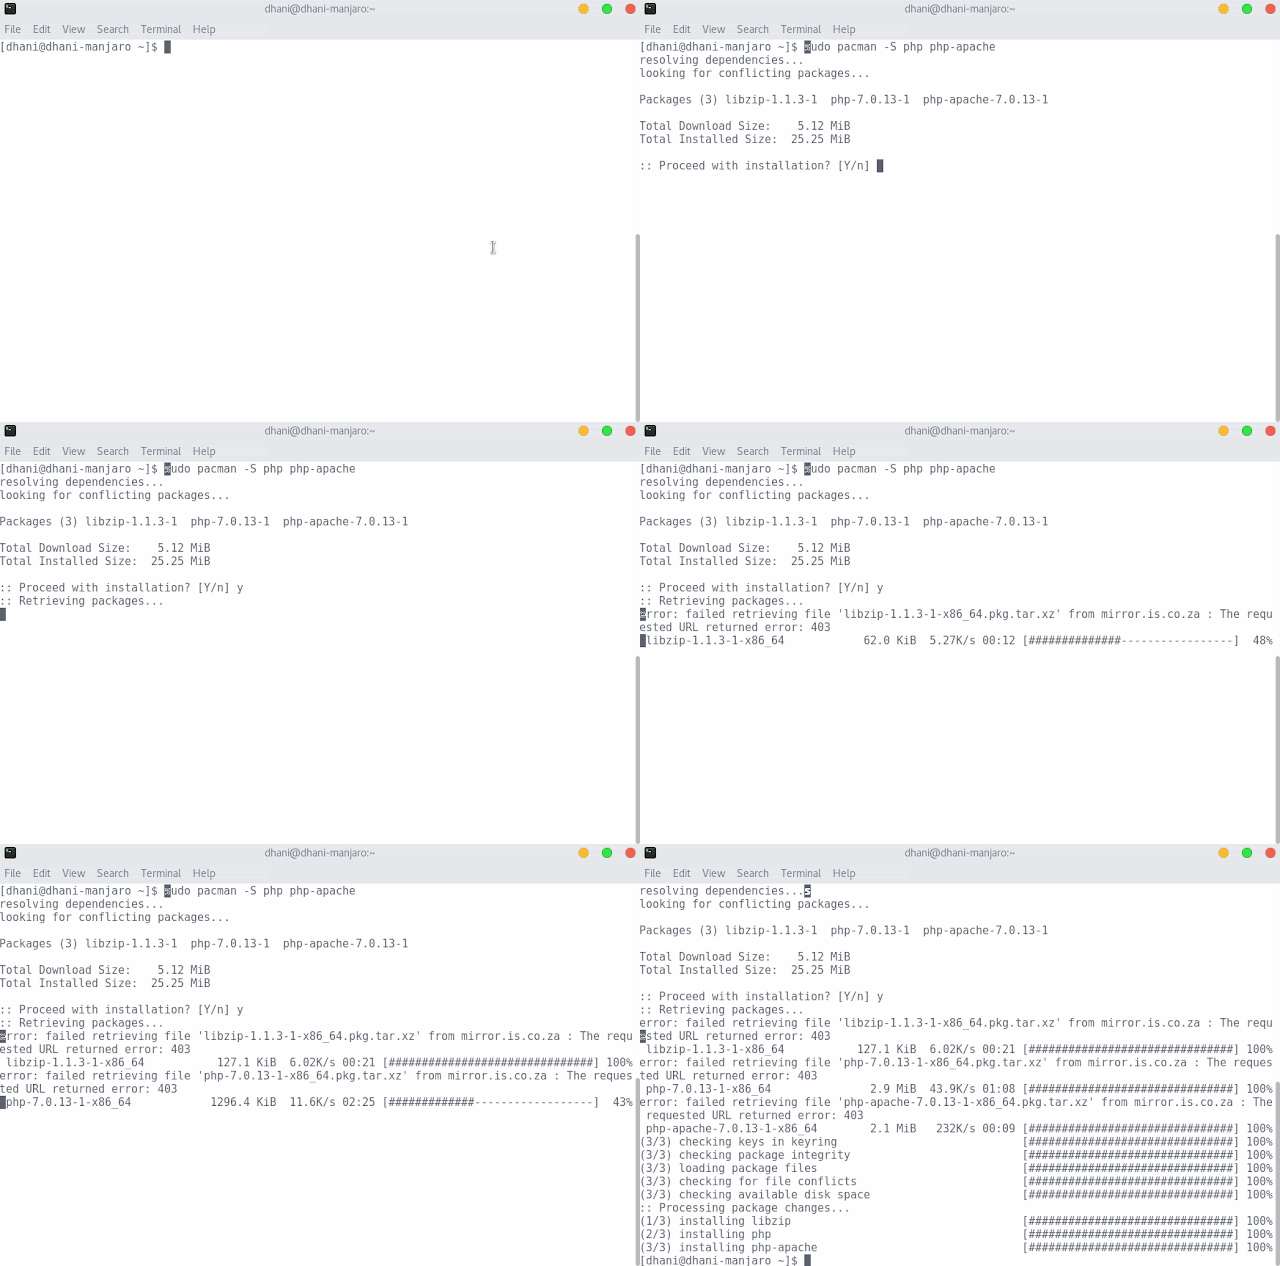
Install PHP with this command
sudo pacman -S php php-apache

Restart Apache
sudo systemctl restart httpd
Now you have LAMP installed on Manjaro 16.10. 

Install Docky on Manjaro 16.10 Budgie Edition

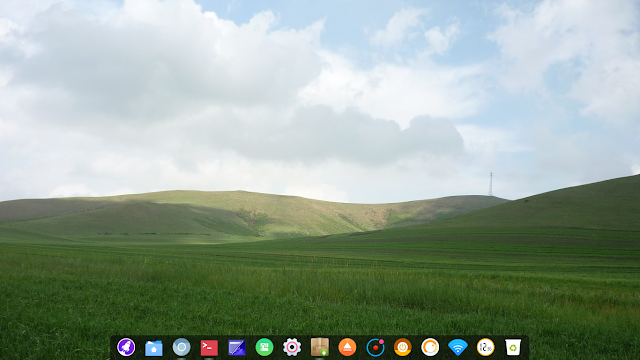
For me, Docky is a good application that every Manjaro users should have. It provides a quick access (shortcut) to favorite applications installed on Manjaro. If you are using Manjaro Budgie edition, Docky is very helpful. Rather than navigating through the main menu, clicking the Docky icon way faster to run applications. 
See how Docky performs on Manjaro 16.10 Budgie Edition


To install Docky on Manjaro 16.10 Budgie Edition, follow these steps:


Install MySQL Server on Manjaro 16.10

MySQL Server on Manjaro-MySQL Server is a powerful database server used my millions websites around the world. Additionally, many people and company now migrate their database to MySQL Server. I am working on a Gold exploration company and we use MySQL Server as our main database server for the geological data. 
MySQL Server can be installed on most Operating Systems such as Windows and Linux. On this tutorial, I will show you how to install MySQL Server on Manjaro 16.10. Installing MySQl can be done through Terminal using pacman install command.
install mysql server on manjaro

Steps to install MySQL Server on Manjaro 16.10

Open Terminal and type the following command
sudo pacman -S mysql
Output
[dhani@dhani-manjaro ~]$ sudo pacman -S mysql
:: There are 2 providers available for mysql:
:: Repository extra
   1) mariadb
:: Repository community
   2) percona-server
Enter a number (default=1): 
Type 1 to select mariadb package or simply press Enter. 
Output:
Resolving dependencies...
looking for conflicting packages...
Packages (4) jemalloc-4.3.1-1  libmariadbclient-10.1.19-1
             mariadb-clients-10.1.19-1  mariadb-10.1.19-1
Total Download Size:    19.44 MiB
Total Installed Size:  172.45 MiB
:: Proceed with installation? [Y/n] y
Type Y to confirm the installation. Then pacman will download required files from the official repository. 

Initial Configuration

When installation completed, now we need to start MySQL and perform initial configuration. Use this command below instead:
sudo mysql_install_db --user=mysql --basedir=/usr --datadir=/var/lib/mysql

Start Mariadb Service

sudo systemctl start mariadb

Secure Mariadb installation

sudo mysql_secure_installation
Output:
[dhani@dhani-manjaro ~]$ mysql_secure_installation
NOTE: RUNNING ALL PARTS OF THIS SCRIPT IS RECOMMENDED FOR ALL MariaDB
      SERVERS IN PRODUCTION USE!  PLEASE READ EACH STEP CAREFULLY!
In order to log into MariaDB to secure it, we'll need the current
password for the root user.  If you've just installed MariaDB, and
you haven't set the root password yet, the password will be blank,
so you should just press enter here.
Enter current password for root (enter for none):
OK, successfully used password, moving on...
Setting the root password ensures that nobody can log into the MariaDB
root user without the proper authorisation.
Set root password? [Y/n] y
New password:
Re-enter new password:
Password updated successfully!
Reloading privilege tables..
 ... Success!

By default, a MariaDB installation has an anonymous user, allowing anyone
to log into MariaDB without having to have a user account created for
them.  This is intended only for testing, and to make the installation
go a bit smoother.  You should remove them before moving into a
production environment.
Remove anonymous users? [Y/n] y
 ... Success!
Normally, root should only be allowed to connect from 'localhost'.  This
ensures that someone cannot guess at the root password from the network.
Disallow root login remotely? [Y/n] n
 ... skipping.
By default, MariaDB comes with a database named 'test' that anyone can
access.  This is also intended only for testing, and should be removed
before moving into a production environment.
Remove test database and access to it? [Y/n] y
 - Dropping test database...
 ... Success!
 - Removing privileges on test database...
 ... Success!
Reloading the privilege tables will ensure that all changes made so far
will take effect immediately.
Reload privilege tables now? [Y/n] y
 ... Success!
Cleaning up...
All done!  If you've completed all of the above steps, your MariaDB
installation should now be secure.
Thanks for using MariaDB!
Note:
Usually, Mariadb root user is none (no pasword). You should change the root password for security reason.

Check Mariadb Status

sudo systemctl status mariadb
Output:
[dhani@dhani-manjaro ~]$ sudo systemctl status mariadb[sudo] password for dhani: ● mariadb.service - MariaDB database server   Loaded: loaded (/usr/lib/systemd/system/mariadb.service; disabled; vendor preset: disabled)   Active: active (running) since Fri 2016-11-25 20:57:21 WIB; 3min 49s ago  Process: 2333 ExecStartPost=/bin/sh -c systemctl unset-environment _WSREP_START_POSITION (code=exited, status=0/SUCCESS)  Process: 2248 ExecStartPre=/bin/sh -c [ ! -e /usr/bin/galera_recovery ] && VAR= ||   VAR=`/usr/bin/galera_recovery`; [ $? -eq 0 ]   && systemctl se  Process: 2245 ExecStartPre=/bin/sh -c systemctl unset-environment _WSREP_START_POSITION (code=exited, status=0/SUCCESS) Main PID: 2303 (mysqld)   Status: "Taking your SQL requests now..."    Tasks: 27 (limit: 4915)   CGroup: /system.slice/mariadb.service           └─2303 /usr/sbin/mysqld
Nov 25 20:57:21 dhani-manjaro mysqld[2303]: 2016-11-25 20:57:21 139820239334912 [Note] InnoDB: Highest supported file format is Barracuda.Nov 25 20:57:21 dhani-manjaro mysqld[2303]: 2016-11-25 20:57:21 139820239334912 [Note] InnoDB: 128 rollback segment(s) are active.Nov 25 20:57:21 dhani-manjaro mysqld[2303]: 2016-11-25 20:57:21 139820239334912 [Note] InnoDB: Waiting for purge to startNov 25 20:57:21 dhani-manjaro mysqld[2303]: 2016-11-25 20:57:21 139820239334912 [Note] InnoDB:  Percona XtraDB (http://www.percona.com) 5.6.32-79.0 sNov 25 20:57:21 dhani-manjaro mysqld[2303]: 2016-11-25 20:57:21 139820239334912 [Note] Plugin 'FEEDBACK' is disabled.Nov 25 20:57:21 dhani-manjaro mysqld[2303]: 2016-11-25 20:57:21 139819646707456 [Note] InnoDB: Dumping buffer pool(s) not yet startedNov 25 20:57:21 dhani-manjaro mysqld[2303]: 2016-11-25 20:57:21 139820239334912 [Note] Server socket created on IP: '::'.Nov 25 20:57:21 dhani-manjaro mysqld[2303]: 2016-11-25 20:57:21 139820239334912 [Note] /usr/sbin/mysqld: ready for connections.Nov 25 20:57:21 dhani-manjaro mysqld[2303]: Version: '10.1.19-MariaDB'  socket: '/run/mysqld/mysqld.sock'  port: 3306  MariaDB Server
Make sure the status is active. This means that we are successfully installed MySQL Server on Manjaro Linux, 
Thank you

Tomahawk Music Player, How to install it on Manjaro 16.10

Tomahawk is a multi platform music player. It has a nice GUI interface, supports many streaming sources and to be honest, Tomahawk could be the best music player for Linux. Here I will show you how to install Tomahawk music player on Manjaro Linux. 
Before I go through the installation, I want to share some images of Tomahawk running on Manjaro 16.10. 
Tomahawk showing my music collections

Tomahawk what's new information

Tomahawk - Spotify

How to install Tomahawk on Manjaro 16.10

Installing Tomahawk on Manjaro 16.10 is very easy. 
  • First, make sure you have enabled the AUR repository on Manjaro
  • Open Add/Remove Software (Pamac) and type "tomahawk". Under AUR tab, you should see Tomahawk listed. 
  • Mark to install Tomahawk and press Apply. Please note that you will be asked to confirm the installation several times on the Pamac interface. 

Install OnlyOffice Desktop Editor on Manjaro 16.10


OnlyOffice Desktop Editor is the desktop edition of the popular collaboration Office Software. It offers a simple, easier way to edit any documents on Linux. On this tutorial, I will guide you to install OnlyOffice Desktop Editor on Manjaro Linux. I am using Manjaro 16.10 on this tutorial but it also applicable to other Manjaro version.


Steps to install Onlyoffice Desktop on Manjaro 16.10

To install, follow these steps:

  • Download Onlyoffice Desktop GUI for Linux
  • Make the installer executable. Right click on the file and click Properties. Click Permission and check the Allow executing file as executable. 
  • Right click on the installer file and click Run. Follow on screen installation wizard. 

Watch the installation Onlyoffice video instruction below

How to install GNOME 3 on Manjaro 16.10

I was expecting an easy and straight forward steps to install Gnome 3 on my Manjaro 16.10. I am using Manjaro KDE edition and planning to install Gnome 3 on top of it. As I read the documentation on Manjaro website, the Gnome 3 installation looks pretty simple. 

Install Gnome 3 on Manjaro instruction

sudo pacman -S gnome
sudo pacman -S gnome-extra
Simply as that. 
But in my case, I got the following error:
error: failed to commit transaction (conflicting files)
gtk3-print-backends: /usr/lib/gtk-3.0/3.0.0/printbackends/libprintbackend-cloudprint.so exists in filesystem
gtk3-print-backends: /usr/lib/gtk-3.0/3.0.0/printbackends/libprintbackend-cups.so exists in filesystem
Errors occurred, no packages were upgraded.


Installation progress


manjaro@manjaro-pc ~]$ sudo pacman -S gnome:: There are 47 members in group gnome::: Repository extra   1) adwaita-icon-theme  2) baobab  3) dconf-editor  4) empathy  5) eog   6) epiphany  7) evince  8) gdm  9) gnome-backgrounds   10) gnome-calculator  11) gnome-contacts  12) gnome-control-center   13) gnome-dictionary  14) gnome-disk-utility  15) gnome-font-viewer   16) gnome-keyring  17) gnome-screenshot  18) gnome-session   19) gnome-settings-daemon  20) gnome-shell  21) gnome-shell-extensions   22) gnome-system-log  23) gnome-system-monitor  24) gnome-terminal   25) gnome-themes-standard  26) gnome-user-docs  27) gnome-user-share   28) grilo-plugins  29) gtk3-print-backends  30) gucharmap  31) gvfs   32) gvfs-afc  33) gvfs-goa  34) gvfs-google  35) gvfs-gphoto2   36) gvfs-mtp  37) gvfs-nfs  38) gvfs-smb  39) mousetweaks  40) mutter   41) nautilus  42) sushi  43) totem  44) tracker  45) vino   46) xdg-user-dirs-gtk  47) yelp
Enter a selection (default=all): resolving dependencies...looking for conflicting packages...
Packages (135) apache-2.4.23-1  atkmm-2.24.2+1+gf30b47f-1  cairomm-1.12.0-2               caribou-0.4.21+0+g36e3d0f-1  cheese-3.22.1-1               clutter-1.26.0+24+g79da526-1  clutter-gst-3.0.20+5+ga71607b-1               clutter-gtk-1.8.2-1  cogl-1.22.2-1.1               colord-gtk-0.1.26+5+ga9d9c91-1  enca-1.19-1               evolution-data-server-3.22.2-1  exempi-2.3.0-1               farstream-0.2.8-1  folks-0.11.3-3               geocode-glib-3.20.1+1+ga646012-1  gjs-1.46.0-2               glibmm-2.50.0-1  gmime-2.6.20-2               gnome-autoar-0.1.1+1+g8d75c44-1               gnome-bluetooth-3.20.0+6+g3bac4f9-1               gnome-color-manager-3.22.2-1  gnome-desktop-1:3.22.2-1               gnome-menus-3.13.3-2  gnome-online-accounts-3.22.2-1               gnome-video-effects-0.4.1+56+g393c78f-1               gom-0.3.2+12+gc7bd13d-1  grilo-0.3.2+8+g6ffe445-1               gtkmm3-3.22.0-1  gtksourceview3-3.22.1-1  js-24.2.0-4               libchamplain-0.12.14+2+ge1f6e59-1  libcue-2.1.0-1               libdmapsharing-2.9.36+1+g6b3d20e-1  libgdata-0.17.6-1               libgdm-3.22.1-1  libgee-0.18.1-1  libgnomekbd-3.22.0.1-1               libgrss-0.7.0+9+gf0637f8-1  libgsf-1.14.40-1               libgtop-2.34.1-1  libgweather-3.20.3+20+gb9a6ef3-1               libgxps-0.2.4+12+g4709da9-1  libibus-1.5.14-1               libiptcdata-1.0.4-3  libmediaart-1.9.0+8+g52eb649-1               libnautilus-extension-3.22.1-1  libnice-0.1.13-1               liboauth-1.0.3+9+g11e9461-1  libosinfo-1.0.0-1               libpeas-1.20.0-1  libphonenumber-7.7.0-2  libquvi-0.9.4-4               libquvi-scripts-0.9.20131130-3  libsigc++-2.10.0-1               libstemmer-0+337-2  libtracker-sparql-1.10.1+3+g0e839d0-1               libwnck3-3.20.1-1  libxklavier-5.4-1  lua52-5.2.4-2               lua52-bitop-1.0.2-7  lua52-expat-1.3.0-3  lua52-lpeg-1.0.0-1               lua52-luajson-1.3.3-2  lua52-socket-20160311-1               mod_dnssd-0.6-6  nautilus-sendto-3.8.4-2               nm-connection-editor-1.4.2-1  osinfo-db-20160728-1               pangomm-2.40.1-1  pcre2-10.22-2  poppler-glib-0.47.0-1               protobuf-2.6.1-2  python-atspi-2.20.2-1  python-xdg-0.25-3               recode-3.6-9  shared-color-targets-0.1.7-1  t1lib-5.1.2-5               telepathy-farstream-0.6.2-2  telepathy-glib-0.24.1-1               telepathy-logger-0.8.2-2  telepathy-mission-control-5.16.4-2               totem-plparser-3.10.7+1+gb25e497-1  vte-common-0.46.1-1               vte3-0.46.1-1  webkitgtk-2.4.11-1               xorg-server-xwayland-1.18.4-1  yelp-xsl-3.20.1-2               adwaita-icon-theme-3.22.0-1  baobab-3.22.1-1               dconf-editor-3.22.1-1  empathy-3.12.12+35+g8311b76-1               eog-3.20.5-1  epiphany-3.22.2-1  evince-3.22.1-1               gdm-3.22.1-1  gnome-backgrounds-3.22.1-1               gnome-calculator-3.22.2-1  gnome-contacts-3.22.1+4+gb235b6d-1               gnome-control-center-3.22.1-1               gnome-dictionary-3.20.0+28+g7dce582-1               gnome-disk-utility-3.22.1-1               gnome-font-viewer-3.22.0+1+gd3cf893-1               gnome-keyring-1:3.20.0+16+gbf8aa97-1               gnome-screenshot-3.22.0+1+g7568f0e-1  gnome-session-3.22.2-1               gnome-settings-daemon-3.22.1-1  gnome-shell-3.22.2-1               gnome-shell-extensions-3.22.2-1  gnome-system-log-3.9.90-2               gnome-system-monitor-3.22.2-1  gnome-terminal-3.22.1-1               gnome-themes-standard-3.22.2-1               gnome-user-docs-3.22.0+1+g61f915e-1               gnome-user-share-3.18.3+2+g7b451ae-1               grilo-plugins-0.3.3+7+gab5596b-1               gtk3-print-backends-3.22.3-1  gucharmap-9.0.2-1               gvfs-1.30.2-1  gvfs-afc-1.30.2-1  gvfs-goa-1.30.2-1               gvfs-google-1.30.2-1  gvfs-gphoto2-1.30.2-1               gvfs-mtp-1.30.2-1  gvfs-nfs-1.30.2-1  gvfs-smb-1.30.2-1               mousetweaks-3.12.0-2  mutter-3.22.2+1+g5c46094-1               nautilus-3.22.1-1  sushi-3.21.91-1  totem-3.22.0+5+ge0bf46e-1               tracker-1.10.1+3+g0e839d0-1  vino-3.22.0-1               xdg-user-dirs-gtk-0.10-2  yelp-3.22.0+1+gfabd8eb-1
Total Download Size:   123,90 MiBTotal Installed Size:  584,37 MiBNet Upgrade Size:      550,17 MiB
:: Proceed with installation? [Y/n] y

Google Chrome 54 is available, Install it on Manjaro 16.10

The new version of Google Chrome 54.0 is now available for download. Manjaro users can easily update or install Google Chrome 54 via Pamac or via Terminal command. There are many improvements and bug fixes comes along version 54. This tutorial is going to show you how to install Google Chrome 54 on Manjaro 16.10. This Google Chrome 54.0 is available in AUR repository, so make sure you have enable AUR repository on your Manjaro.

Install Google Chrome 54.0 on Manjaro 16.10

Easy mode

Open Pamac (Add/Remove Software) and type "chrome" on the search box.
Mark Google Chrome for installation and press Apply to confirm. 

Terminal Mode

If you prefer the command line, you can install Google Chrome stable version with this command
yaourt -S google-chrome
Follow the instruction shown on the Terminal until it completed.

How to install Dropbox on Manjaro 16.08

Dropbox is a popular cloud storage. If you are both Dropbox and Manjaro users, you may want to install Dropbox client on your Manjaro desktop. This tutorial will guide you to install Dropbox on Manjaro. I am using Manjaro 16.08 KDE edition on this tutorial. This should be also applicable to any other Manjaro edition as well. 

Steps to install Dropbox on Manjaro 16.08

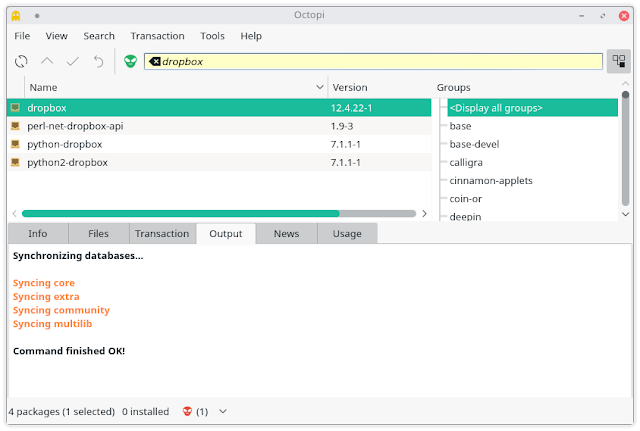
1. Open Octopi (Add/Remove Software)
2. Type Dropbox on the search box
3. Right click the Dropbox from the search result list and click Install. 
4. Press Apply button and wait while Octopi download and install the program. 
5. When completed, run Dropbox from application menu.

Dropbox Preferences

Manjaro 16.10 Gnome Edition Graphical Interface problem

I just downloaded the latest version of Manjaro 16.10 Community edition Gnome version. I tried to run this distro on my Virtualbox. Basically it went well but I discover some weird problems with the graphical interface. It seems like Gnome did not loaded correctly and left some really annoying artifact. 
I spot some problems on the top panel. Those icons shouldn't be there. I also tried to boot Manjaro 16.10 Gnome on my Laptop using Live USB and still have this problem as well. Is it because the VGA driver or something else, I still try to find out. 

Flatabulous theme on Manjaro Budgie 16.10

I was a bit boring with the default Manjaro Budgie 16.10 look. And I am looking for another theme for my Manjaro Budgie. Thanks to anyone who contribute to the Flatabulous theme development. The have provide a great theme for Arch, Manjaro, and all other Linux distribution. Flatabulous theme was a fabulous theme available out there. 


See how Flatabulous GTK theme performs on my Manjaro Budgie
Arc Flatabulous 

Arc Flatabulous Dark
Arc Flatabulous Darker
What do you think?

How to create Manjaro Live USB from Linux

On my previous Manjaro Tutorial, I have shown how to create Manjaro Live USB from Windows 10 using Rufus program. And now, I will show you how to create Manjaro Live USB from Linux system. I am using Ubuntu 16.04 to create this Live USB.
create manjaro live usb from linux

Requirements

Make sure you have the following items in hand:
  • Manjaro ISO
  • 4GB or larger USB Flash Disk (USB 3.0 is highly recommended)
  • A running Linux OS
  • A little knowledge of Terminal commands

Steps to create Manjaro Live USB from Linux

Step 1. Plug USB Flash Disk

Plug your USB flash disk to any USB ports on your computer.

Step 2. Open Terminal

Open Terminal and cd to the directory where Manjaro ISO is located. For example, in my case, my ISO is in /home/dhani/Downloads directory.
cd /home/dhani/Downloads

Step 2. Create Live USB

Now execute this command to start copying files to the USB flash drive.
sudo dd bs=4M if=manjaro-deepin-16.08-x86_64.iso of=/dev/sdc status=progress
Change the text in red with your own. /dev/sdc is my USB flash drive drive letter. You can find out which one is yours by executing fdisk command below
sudo fdisk -l
Output:
Disk /dev/sdc: 7.2 GiB, 7776239616 bytes, 15187968 sectorsUnits: sectors of 1 * 512 = 512 bytesSector size (logical/physical): 512 bytes / 512 bytesI/O size (minimum/optimal): 512 bytes / 512 bytesDisklabel type: dosDisk identifier: 0x5b45e23c
When the copying process is completed, reboot your computer and boot it from the new Manjaro Live USB. 

Manjaro 16.08 Budgie Review and Screenshots

Manjaro 16.08 Budgie Review and Screenshots

Another thing that makes me fall in love with Linux is the fact that we can choose from various desktop environments. KDE, Gnome, Xfce, Openbox, Deepin, MATE, Cinnamon and Budgie are the desktop environment we can choose from. Manjaro releases different editions with all those desktop available. On this post, I will give a short review about Manjaro Budgie edition. Manjaro Budgie Edition is delivered to users as a Live ISO where we can use it to boot our computer without having to install it permanently.

The Desktop

Manjaro Budgie comes with a minimalist and simple desktop. There is a panel at the upper screen where all menus and shortcut is located. The default wallpaper need some work out.
So let me change it to something more dynamic and up to date. I hope you like it as well.

Main Menu

Budgie desktop utilize a simplified menu. Basically we can access all installed applications and settings throught this menu. Its pretty simple, easy to use that everyone will love. This main menu is located at the top left of the Budgie desktop.

Software Manager

Pamac Software Manager is a one stop solution for your software needs. Its very easy to use and complete.

System Settings

System Settings provide easy access to configure Manjaro system.

Office Applications

LibreOffice 5 is installed as default. If you are planning to use Manjaro Budgie for working, its ready.

How to install VLC Media Player on Manjaro 16.10

How to install VLC Media Player on Manjaro 16.10

This tutorial is going to show you how to install VLC on Manjaro. VLC is a free, rich features and powerful multimedia player. In most Manjaro variants, VLC is not installed by default. But don't worry, we can easily install it. 

Steps to install VLC on Manjaro

GUI Mode

Open Add/Remove Software and then type vlc. Right click vlc on the search result and select install. Press Apply to start the installation. 
Press Commit to confirm the installation. 

Important Notice:
If VLC successfully installed but it won't start, you may need to install qt4. Install it using above method. Now VLC should be working. 

Terminal Mode

If you prefer to install VLC on Manjaro via Terminal, you can use the following command to install it. 
sudo pacman -S vlc qt4
Thanks for reading this post. 

How to Install Atom on Manjaro 16.10

This tutorial will show you how to install Atom on Manjaro 16.10. Atom is a powerful, rich features text editor for Linux. Its also available for Windows as well. Atom is a text editor that's modern, approachable, yet hackable to the core. Atom is a tool you can customize to do anything but also use productively without ever touching a config file.
You can write PHP, Python, Shell programming using Atom. Or simply open multiple text files, Atom can easily handles the task.

Atom comes with a simple user interface. But actually it has many powerful tools hidden inside the upper menu.


Video tutorial installing Atom on Manjaro Linux

Steps to install Atom on Manjaro

GUI Mode

First, Open Add/Remove Software and then type "atom" on the search box. You will see atom listed on the search result. Right click on it and select Install. Press Apply button to confirm the installation. We included a short video showing the Atom installation on Manjaro 16.10.

Install Atom via Terminal 

If you prefer to install atom via Terminal, the following command should work
sudo pacman -S atom

Thanks for reading. Share this article so more people can read it and use it. 

How to check Kernel version on Manjaro

Some of you may want to know which Kernel version installed on your Manjaro desktop. With a little trick, you can easily reveal the Kernel version via Terminal command line. Use the following command to check the Kernel version on Manjaro. 
uname -r
The uname command will print the information about your current system. Here are the available options along with uname command:

Example: (I use Solus OS to show an example but basically its pretty the same on Manjaro.)


Manjaro 16.10 KDE video Installation tutorial

I have created a short video showing the installation process of the new Manjaro 16.10 KDE edition. Manjaro KDE is an exceptionally beautiful Linux desktop. The new Plasma Desktop is fast and pretty cool.
 Watch the video below


Manjaro KDE could be a good alternative to other Manjaro edition. The installation only took few minutes to complete.

Beautiful Manjaro 16.08 KDE Desktop

Manjaro is highly customisable Linux desktop. With a little efforts, we can turn Manjaro into a beautiful and nice looking desktop. Here are some screenshots of my modified Manjaro 16.08 KDE edition.
The Setup
  • GTK2 and GTK3 theme : Arc Dark GTK
  • Icon : Papyrus Arc Dark

beautiful manjaro kde
Manjaro KDE edition App Menu

If you like my setup, you can install it on Manjaro KDE with this command:
yaourt -S arc-dark-suite
And you can also install Papyrus Arc Icon from this link

How to use Manjaro as a Web Server with Apache, MySQL and PHP (LAMP)

How to use Manjaro as a Web Server. I do believe that Manjaro is a stable Linux distribution, beautiful desktop as well. But with a little efforts, we can turn this cute distribution into a world class Web Server. LAMP (Linux Apache MySQL PHP) is a great combination to create a powerful, secure and stable web server on top of Linux system. This tutorial will show you how to install LAMP on Manjaro. Its a pretty long article but I tried to make it as clear as I can.

Step to build a web server on Manjaro

Please note that this tutorial requires a pretty basic knowledge on Terminal commands. Most steps here can be done via Terminal and as root privileges. 

Step 1. Update Manjaro
pacman -Syu
Step 2. Install and Configure Apache
pacman -S apache
Edit  /etc/httpd/conf/httpd.conf
nano /etc/httpd/conf/httpd.conf
Now search and comment out the following line
#LoadModule authn_file_module modules/mod_authn_file.so
Now restart Apache and start Apache on boot
systemctl enable httpd
systemctl restart httpd
Check the Apache status
systemctl status httpd
Output
[manjaro-tutorial manjaro]# systemctl status httpd
● httpd.service - Apache Web Server
   Loaded: loaded (/usr/lib/systemd/system/httpd.service; disabled; vendor preset: disabled)
   Active: active (running) since mar 2016-11-08 06:17:44 WIB; 15s ago
 Main PID: 12618 (httpd)
    Tasks: 82 (limit: 4915)
   CGroup: /system.slice/httpd.service
           ├─12618 /usr/bin/httpd -k start -DFOREGROUND
           ├─12620 /usr/bin/httpd -k start -DFOREGROUND
           ├─12621 /usr/bin/httpd -k start -DFOREGROUND
           └─12622 /usr/bin/httpd -k start -DFOREGROUND

nov 08 06:17:44 manjaro-tutorial systemd[1]: Started Apache Web Server.
nov 08 06:17:44 manjaro-tutorial httpd[12618]: AH00558: httpd: Could not reliably determine the server's fully qualified domain name
At this point the Apache is ready. You can test it via your web browser by typing the following address:
http://localhost or http://youripaddress

Step 3. Install MariaDb

To install MariaDB, you can use the following command on Terminal
pacman -S mysql
You will be asked to select which package to install. On the example below, I choose 1.
[manjaro-tutorial manjaro]# pacman -S mysql
:: There are 2 providers available for mysql:
:: Repository extra
   1) mariadb
:: Repository community
   2) percona-server

Enter a number (default=1): 1
resolving dependencies...
looking for conflicting packages...

Packages (4) jemalloc-4.3.0-1  libmariadbclient-10.1.18-1  mariadb-clients-10.1.18-1  mariadb-10.1.18-1

Total Download Size:    19.40 MiB
Total Installed Size:  172.36 MiB

:: Proceed with installation? [Y/n]
Once completed, we need to initialize MariaDB to get work.
mysql_install_db --user=mysql --basedir=/usr --datadir=/var/lib/mysql
Now start MariaDB and make it run on boot
systemctl enable mysqld
systemctl start mysqld
Check the status
systemctl status mysqld
Output:
[manjaro-tutorial manjaro]# systemctl status mysqld
● mariadb.service - MariaDB database server
   Loaded: loaded (/usr/lib/systemd/system/mariadb.service; disabled; vendor preset: disabled)
   Active: active (running) since mar 2016-11-08 06:25:17 WIB; 2s ago
  Process: 13831 ExecStartPost=/bin/sh -c systemctl unset-environment _WSREP_START_POSITION (code=exited, status=0/SUCCESS)
  Process: 13745 ExecStartPre=/bin/sh -c [ ! -e /usr/bin/galera_recovery ] && VAR= ||   VAR=`/usr/bin/galera_recovery`; [ $? -eq 0 ] 
  Process: 13742 ExecStartPre=/bin/sh -c systemctl unset-environment _WSREP_START_POSITION (code=exited, status=0/SUCCESS)
 Main PID: 13801 (mysqld)
   Status: "Taking your SQL requests now..."
    Tasks: 27 (limit: 4915)
   CGroup: /system.slice/mariadb.service
           └─13801 /usr/sbin/mysqld

nov 08 06:25:16 manjaro-tutorial mysqld[13801]: 2016-11-08  6:25:16 140392520748544 [Note] InnoDB: Highest supported file format is Ba
nov 08 06:25:17 manjaro-tutorial mysqld[13801]: 2016-11-08  6:25:17 140392520748544 [Note] InnoDB: 128 rollback segment(s) are active.
nov 08 06:25:17 manjaro-tutorial mysqld[13801]: 2016-11-08  6:25:17 140392520748544 [Note] InnoDB: Waiting for purge to start
nov 08 06:25:17 manjaro-tutorial mysqld[13801]: 2016-11-08  6:25:17 140392520748544 [Note] InnoDB:  Percona XtraDB (http://www.percona
nov 08 06:25:17 manjaro-tutorial mysqld[13801]: 2016-11-08  6:25:17 140392520748544 [Note] Plugin 'FEEDBACK' is disabled.
nov 08 06:25:17 manjaro-tutorial mysqld[13801]: 2016-11-08  6:25:17 140391793817344 [Note] InnoDB: Dumping buffer pool(s) not yet star
nov 08 06:25:17 manjaro-tutorial mysqld[13801]: 2016-11-08  6:25:17 140392520748544 [Note] Server socket created on IP: '::'.
nov 08 06:25:17 manjaro-tutorial mysqld[13801]: 2016-11-08  6:25:17 140392520748544 [Note] /usr/sbin/mysqld: ready for connections.
nov 08 06:25:17 manjaro-tutorial mysqld[13801]: Version: '10.1.18-MariaDB'  socket: '/run/mysqld/mysqld.sock'  port: 3306  MariaDB Ser
nov 08 06:25:17 manjaro-tutorial systemd[1]: Started MariaDB database server.

Step 4. Install PHP

To install PHP on Manjaro, use this command
pacman -S php php-apache
Once installed, we need to configure the httpd.conf file once again.
nano /etc/httpd/conf/httpd.conf
Comment out the following line
#LoadModule mpm_event_module modules/mod_mpm_event.so
And also copy and paste these lines to the bottom of the httpd.conf file
LoadModule mpm_prefork_module modules/mod_mpm_prefork.so
LoadModule php7_module modules/libphp7.so
AddHandler php7-script php
Include conf/extra/php7_module.conf
Save and close the httpd.conf file. At this point the web server is ready. 

Test PHP

Optionally, we can check and verify if the php is working. Create a new file, for example my.php inside Apache root directory (/srv/http/)
nano /srv/http/my.php
Type this line into it
<?php
 phpinfo();
?>
Its good to restart the web server.
systemctl restart httpd
Now open web browser and type this:
http://localhost/my.php
Ouput
Now all packages have been installed and well configured. Now our Web Server is ready for further use. Thanks for coming and please share this article if you found useful.